Troubleshooting a WordPress website is challenging. Troubleshooting a live site posses more challenges. You may have read a lot of advice on the Internet from somewhere, among which, “disable all plugins” is one that mentioned most.
Should you?
In the world of troubleshooting, there is no “one fits all” solution. Each case is different. In some cases, there are error messages thrown out on the screen or in error log, which should be the first clue for experienced troubleshooter. When clear error messages can’t be found, “disable all plugins” is one way to start the troubleshooting process other than “don’t know where to start”.
If you don’t know yet, “disable all plugins” means, to isolate the troublemaker, the troubleshooting process starts from disabling all plugins, then switch plugins back on one by one. While activating each plugin, check the front end of the website after each activation. Until the problem reappears, the last plugin you activate can be identified as the “bad guy”.
Since problem may just caused by one “bad guy”. Killing all good guys is not the best approach in most case. In my practice, I use “roll back” approach instead of “disable all plugins”. The advantage of my roll back approach is time, because I can locate the problem faster and save a lot of time by rolling back.
How to Roll Back?
When I use roll back approach in troubleshooting, instead of disabling all plugins, I simply flip off (deactivate) and switch back on (activate) each plugin one by one, by the plugin update time descending order. Since the problem is likely caused by the latest plugin update, checking plugin by tracking back in time can help to locate the problem faster.
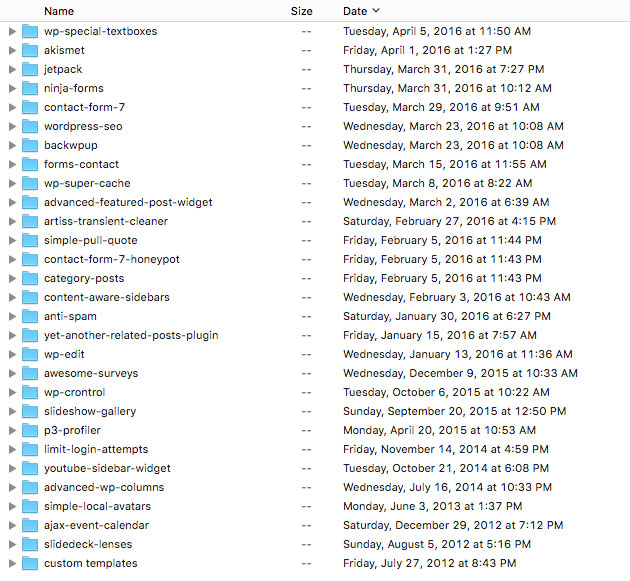
If the website is new to me, I may not know the website update history. In most cases, the client doesn’t know either. It is not the end of the world because we can use FTP app to find out plugin update time log, or use File Manager in cPanel.
For example, here is a screenshot of a typical WordPress plugins directory list. After sorting by date, we have a plugin update time log. This is the plugin check order we want to follow. We want to start our investigation from latest updated plugin and go backwards.
After locate the plug that causes trouble, we can replace it with its previously known stable version from either website backup, or from wordpress.org plugin public repository. Then contact plugin author for a possible fix, or find a replacement.
The Advantage
Other than saving time on troubleshooting, deactivating / re-activating plugin one by one offers another advantage. When using “disabling all plugin” method, the website won’t look and function as it was until most of the plugins are switched back on. By checking plugin one by one, only one plugin is deactivated at any given time. We have a close to full function website to troubleshoot with, which sure makes the job easier comparing with a near broken site.
Note
Like all other development tasks, there are a couple of things you should do before jumping into the troubleshooting:
- Make a backup of current website. So you know you are covered.
- Put the website in maintenance mode. (If you don’t know, search “maintenance” in wordpress.org for plugin)
Hope my experience can help you in your troubleshooting. Thank you for reading, as always.