Although WooCommerce default page templates are mobile responsive overall, further polish is required to match the theme for each specific project. In one of my latest projects, I ran into the problem with default WooCommerce product quantity input box. It is designed for desktop browser, using a mouse and / or keyboard as input device. On mobile device, especially smartphone, changing product quantity can be fussy.
The problem
The product quantity input box isn’t optimized to deliver the best mobile user experience. The tiny little arrows to adjust product quantity is not going to work and appear on touch screen device anyway. It is activated by mouse hover action. To change product quantity on touch screen device, 4 key strokes (touches) are required, which can be optimized.
The Solution
Ideal solution is to make two touch friendly buttons to handle changing product quantity task.
Due to the natural of the hack, there is no plugin for this customization. Guess because plugin works when there is a plug-able hook in the targeted product. And WooCommerce doesn’t provide any hook for this job. (Currently, version 2.3.10 is the latest). For this job, the only way is to overwrite the default template.
WooCommerce uses template file: quantity-input.php to handle product quantity input. The file is located in “global” subfolder. The solution is to add two buttons to handle quantity change into the template file directly.
Let’s crack!
Step 1: The template
<div class="quantity">
<span class="product_quantity_minus">-</span>
<input type="number" step="<?php echo esc_attr( $step ); ?>" <?php if ( is_numeric( $min_value ) ) : ?>min="<?php echo esc_attr( $min_value ); ?>"<?php endif; ?> <?php if ( is_numeric( $max_value ) ) : ?>max="<?php echo esc_attr( $max_value ); ?>"<?php endif; ?> name="<?php echo esc_attr( $input_name ); ?>" value="<?php echo esc_attr( $input_value ); ?>" title="<?php _ex( 'Qty', 'Product quantity input tooltip', 'woocommerce' ) ?>" class="input-text qty text" size="4" />
<span class="product_quantity_plus">+</span>
</div>
Line 2 & 4 is where I add the HTML to display the buttons. In real project, I like using iconic font from Font Awesome. In this demo, text is used to simplify the code.
Step 2: The CSS
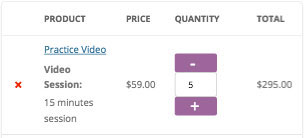
The horizontal layout fits product page well even on smartphone portrait mode. But it doesn’t fit the small shopping cart table in smartphone portrait mode. On smartphone, we may like to re-arrange the bottom and quantity input box vertically like this:
Following is the CSS for the buttons, including handling vertical layout in mobile portrait mode. It is customized for theme “Twenty Twelve”. Further customization is required for your specific theme.
.woocommerce .quantity .product_quantity_minus,
.woocommerce .quantity .product_quantity_plus {
	width: 12px;
	height: 19px;
	display: inline-block;
	color: white;
	padding: 6px;
	background: #a46497;
	margin-right: 0;
	border-radius: 3px;
	font-size: 20px;
	cursor: pointer;
	line-height: 1;
}

.woocommerce .quantity .qty {
	display: inline-block;
	height: 17px;
	vertical-align: top;
}

/* Smartphone - portrait (max 479px) */
@media screen and (max-width: 479px) {
	.woocommerce .shop_table.cart .quantity .product_quantity_minus,
	.woocommerce .shop_table.cart .quantity .product_quantity_plus {
		width: 29px;
		height: 18px;
		display: block;
		padding: 3px 5px 3px 20px;
	}
}
Step 3: The Script
Finally, the magic part – the jQuery script that makes the buttons work.
jQuery(document).ready(function($) {
	$(".product_quantity_minus").click(function(e){
		var quantityInput = $(this).closest(".quantity").children("input");
		var currentQuantity = parseInt($(quantityInput).val());
		var newQuantity = ( currentQuantity > 1 ) ?  ( currentQuantity - 1) : 1;
		$(quantityInput).val(newQuantity);
	});

	$(".product_quantity_plus").click(function(e){
		var max_quantity = 99999;
		var quantityInput = $(this).closest(".quantity").children("input");
		var currentQuantity = parseInt($(quantityInput).val());
		var newQuantity = ( currentQuantity >= max_quantity ) ?  max_quantity : ( currentQuantity+1 );
		$(quantityInput).val(newQuantity);
	});
});
To make it work on your site, you can add my snippet into separate files following your coding standard. To upload and make the custom WooCommerce proudct quantity template working, you need to follow WooCommerce template customization. (How to override default WooCommerce template?) For this particular file, it should goes to %your_theme_folder%/woocommerce/global/. You can then add css to your stylesheet and script to your js file seperately.
[Link] Download Mobile Responsive WooCommerce Product Quantity Input Template here.
Hi Jerry,
Your script is really good and fill out the gap I am facing in a current project where these options are not available by default.
However when there are more than 1 product in the cart, the step value is considering the quantity of items. I think it might be something to tune in the jQuery script.
Do you see the same?
Thank you,
Rodrigo
My apology and thank you VERY MUCH for pointing that out.
I didn’t test it thoroughly. Hope it isn’t a bad news for you, because the all-in-one solution is not working for multiple item in cart.
I CAN NOT add the script in the template file. Because it is a template, and will be repeated when there are more than one item. If I added the script into the template, then the script will be loaded exact same times as the quantity of items in the cart. Hence, being executed multiple time.
The CSS must goes to style.css, and jQuery (javascript) must go to a seperate file and load once.