It takes only few clicks to install WordPress. But making your installation safer and securer needs further tweaks and checkups. Here a list of things I will go though when a WordPress installation is submitted to me for security enhancement. You should do this too.
1. No “admin” User
Default WordPress installation create a default administrator by the user name “admin” unless otherwise instructed. If you install WordPress by simply clicking through steps, you will get an “admin” user when finish installation for sure.
Having an “admin” doesn’t necessarily mean your website will be hacked. The famous WordPress Admin Brute Force Attack will try to crack into any site anyway. Leaving an “admin” user gives away 50% of login credential. If the password happen to be in the popular passwords list, such as “12345678”, the installation will be hacked within seconds.
2. No “wp_” Database Table Prefix
Same as how you get an “admin” user, you will get a “wp_” table prefix as default installation option. If so, the Change DB Prefix plugin can help you automatically fix this potential security concern. Apparently, the recommended solution is to change the “wp_” during setup, or change it right after setup.
* If your WordPress website has been up running for few years, with multiple plugins installed, applying this tip may break your website as I’ve encountered in a little percentage of sites among my management. Backup beforehand is not an option, but a must.
3. Update WordPress Security Keys
Open wp-config.php in your favorite text editor, also visit following page in web browser:
https://api.wordpress.org/secret-key/1.1/salt/
copy what you get (the security keys) in the browser, and paste them into place where you can find in wp-config.php like this:
/**#@+
 * Authentication Unique Keys and Salts.
 *
 * Change these to different unique phrases!
 * You can generate these using the {@link https://api.wordpress.org/secret-key/1.1/salt/ WordPress.org secret-key service}
 * You can change these at any point in time to invalidate all existing cookies. This will force all users to have to log in again.
 *
 * @since 2.6.0
 */
define('AUTH_KEY',         'put your unique phrase here');
define('SECURE_AUTH_KEY',  'put your unique phrase here');
define('LOGGED_IN_KEY',    'put your unique phrase here');
define('NONCE_KEY',        'put your unique phrase here');
define('AUTH_SALT',        'put your unique phrase here');
define('SECURE_AUTH_SALT', 'put your unique phrase here');
define('LOGGED_IN_SALT',   'put your unique phrase here');
define('NONCE_SALT',       'put your unique phrase here');

/**#@-*/
In a nutshell, the security keys refer to 4 authentication keys and 4 hashing salts. They work together to add an extra layer of security to cookies and passwords, and make your site harder to hack.
If your site is installed properly, the Keys and Sales should be in place without manual update. But there are many different ways to install WordPress, always make sure this part is not left blank.
4. Remove Unwanted, Unnecessary & Inactive
WordPress, including its themes and plugins, is a software package. There are instructional documents for developers that are not required for running the website. You can check this blog to find out what files to remove. (WordPress Security Tip: Delete ReadMe after Installation).
Same rule applies to themes and plugins. Even you are a developer, you don’t need the both of the default themes “Twenty Eleven” & “Twenty Twelve”. If you are not running a blog, the plugin “Akismet” is not required as well. The idea is, if the website doesn’t need it, it shouldn’t be there.
5. Lock Down File Access
There are certain important system files containing WordPress configuration and other sensitive information you would like to keep private. Unlike those unnecessary files mentioned in tip #3, these files are crucial to WordPress and website operation. It is recommended to add extra protection by locking down file access from server level. (WordPress Security Tip: Lock Down File Access)
6. Disable Directory Browsing
WordPress is recommended to hosted on Apache server in Linux environment. Some hosting companies will DISABLE directory browsing by default, while others leave this ENABLED. A quick test can unveil the truth by browsing a folder like this::
http://yourdomain/wp-content/themes/
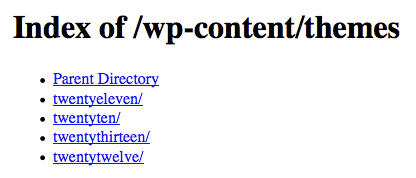
If it is DISABLED, you can get a 404 Page Not Fund, or 403 Forbidden (depend on your site setup). If this is ENABLED, you can see the directory list and browse through each individual folder. This is dangerous.
Add following lines to the .htaccess file (in the root directory of the website).
# Disable directory browsing
<IfModule mod_autoindex.c>
    Options -Indexes
</IfModule>
If by any chance, “Options” is not allowed in .htaccess file by your hosting company, or this trick doesn’t work for you, create an empty index.php in every folder that you do not want user to browse.
7. Disable PHP Execution in Certain Directories
WordPress is a PHP based web application, by default, PHP execution is enabled globally. For security purpose, you should disable this in certain directories, such as
- http://yourdomain/wp-content/uploads/
- http://yourdomain/wp-includes/
To do so, create a blank file in your favorite text editor, and paste the following code in:
# Disable PHP execution
<Files *.php>
  Deny from all
</Files>
Save it as .htaccess, and upload it to /wp-content/uploads/ folder. Upload another one to /wp-includes/.
8. A Backup Plan
It doesn’t matter the installation is for development or live website, a scheduled backup plan is REQUIRED to prepare yourself for any unexpected event. In any extreme case, disaster can be easily recovered from the backup. To make sure the backup serves its purpose, the backup files should be stored on a secure and remote location that not on the same server where the website is hosted.
For WordPress backup, I recommend free plugin BackWPup. Or you can go for paid plug like Backup Buddy.
When installing WordPress via cPanel, some of the security measures have become a standard practice and been applied to every installation. It won’t hurt to check on every point that could possibly become a security bleach.
There are more things you can do to protect your WordPress installation and strengthen website security. While some of them aren’t really effective, and others will change the way users interact with the website. For example, limit login attempts & add 2-step authentication. You can keep on exploring the possibilities as you meet the new challenges.