If you are keen to WordPress performance, you should have known CDN (Content Delivery Network). The purpose is to deploy website content across multiple servers, to make webpage load faster from end user’s perspective. I am not writing this to explain why should you use CDN, but explaining how to setup Amazon S3 & CloudFront as an alternative CDN solution.
Being a long time Amazon AWS user, I primarily use S3 as storage server. Since paying extra attention to website performance, CDN is always hanging there only as a solution. I didn’t really dig into CDN mainly because my sites are not very busy, and won’t benefit much from the extra dollars spent on dedicated service like CloudFlare, MaxCDN, etc. But Amazon AWS indeed provides excellent solution for speeding up content delivery without breaking the bank. You pay for only what you use.
Long story short, there are two ways to use Amazon S3 & CloudFront.
The first simple way is storing files on S3, and link files to your web page like this:
http://s3.amazonaws.com/bucketname/filename
This is no so much a CDN solution, as files are stored on one of the Amazon S3 server (location of your choice) only. We simply take some load off web server and dump it to S3. To take advantage of Amazon’s robust cloud infrastructure, we shall use both CloudFront & S3. CloudFront is designed as a series of edge servers. When visitor requests an object from CloudFront, that object is pulled off the origin location (in this case, S3), and cached in the nearest CloudFront edge location for certain amount of time.
The idea is storing files on S3, and distributing through CloudFront. Following is the steps to setup Amazon S3 & CloudFront as CDN for WordPress. (Assume you already have your own Amazon AWS account).
Step 1. Create a S3 Bucket
First, we create a dedicated S3 bucket to store files. Login to Amazon AWS Console, go to S3 Management Console, and create a new bucket.

This bucket is the origin location used for CloudFront.
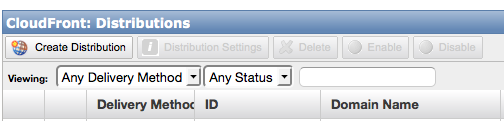
Step 2. Create a CloudFront Distribution
Switch to CloudFront Management Console, click Create Contribution button on the title bar of CloudFront: Distributions pane.
In terms of the delivery method for distribution, choose Download for static content, or Streaming for audio/video streaming.
The following step is to fill up the detail for this distribution. There are online help for each individual field in case you don’t understand that specific entry, and even more detailed developer documentation from Help menu.
To fast forward, here is the Origin Settings:
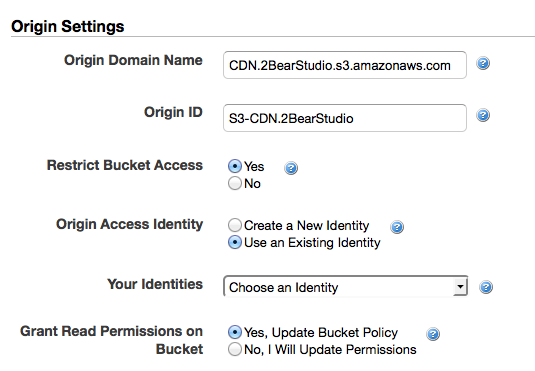
- Origin Domain Name A drop down list you can select from. I choose the one created in Step 1 for this distribution.
- Restrict Bucket Access
Yes – To use cloudfront URL, i.e., xxxxxxxx.cloudfront.net
No – To use s3 URL, e.g., s3.amazonaws.com - Grant Read Permission on Bucket Choose Yes to let Amazon AWS to create a new policy for this bucket with read permission. This also takes care of the Your Identities field.
For the fields in Default Cache Behavior Settings, you can pretty much leave it as it unless you have special requests.
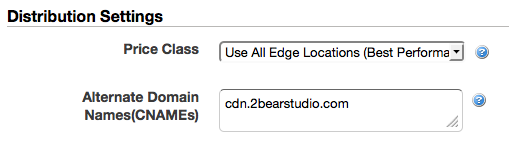
In Distribution Settings, you may want to pay attention to the first field Price Class as it sets the pricing for your bill. If you are happy with using cloudfront.net URL, leave Alternate Domain Names(CNAMEs) blank. Otherwise, you can fill it up with a unique subdomain name for branding.
Click on Create Distribution to finish.
Now, in the updated CloudFront: Distributions list, mark and copy the Domain Name. This is the domain name AWS created for this distribution, which you will use on your website.
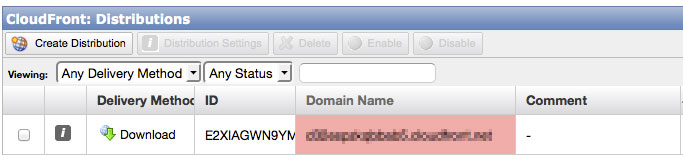
If you prefer use your own domain name, like the one I assigned (cdn.2bearstudio.com), you need to finish step 3.
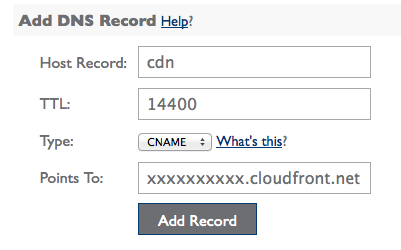
Step 3. Create CNAME for Branding
This step has nothing to do with Amazon AWS, and can only be done at domain registration company’s cPanel. Different hosting company has different interface, but it should be found inDNS Zone Editor.
Add a new CNAME record, and wait for about 12-24 hours the new subdomain takes effect.
After setup Amazon CloudFront, you can go over your website, copy static files that want to distribute via CDN to S3. Then replace the link to those files from existing site to new URL. For example, your existing link to image.jpg is:
http://yourdomain.com/images/image.jpg
can be changed to:
http://xxxxxxxxx.cloudfront.net/image.jpg or
http://cdn.yourdomain.com/image.jpg
The fun doesn’t stop here. Some major WordPress caching plugin like WP Super Cache or W3 Total Cache has Amazon CDN support built-in. Tweak the settings to further tune up your website performance.